
Making your own compost creates just one more way for your home to be self-sufficient. Compost can be used to fertilize your yard, garden, and potted plants. It can also be spread out over as ground cover during cold months to help protest your grass and gardens. Several ways exist to get started, so you will have to think about what is best for your home. Also, some cities don't allow for composting openly even in your own backyard, so please be sure to check into this before investing in the project. Composting costs range from very little to very expensive. I'm going to show you one way to get started for about $40.
Things you will need to buy:


1 large clean garbage can with lid ($10)
* Use Plastics #2 HDPE, #4 LDPE, or #5 Polypropylene. These are the only food safe plastics that will be able to withhold the temperature.
1 small shovel ($10)
1 roll of mesh screening, soft ($6)
1 roll outdoor duct tape ($9)
2 bungee cords to fit over the lid of your garbage can (about $2 each)
Things you probably have around the house:
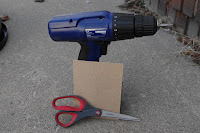


1 power drill OR hammer and awl
10 bricks
1 piece fine sand paper
scissors
Step 1: Gather your supplies
Step 2: Create air and drainage holes
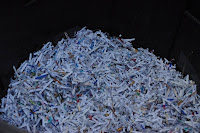
Using the drill, or hammer and awl, create air and drainage holes in your garbage can. These can be placed anywhere, so long as there are enough to effectively allow of movement of air and water. The drainage holes in the bottom keep water flowing through so that the material doesn't get too wet. The air holes keep movement of oxygen constant to encourage decomposition. Keep holes small and nice spaced apart. Use the sand paper to file down and soften each hole(optional)


Step 3: Add screen mesh around the bottom of the can, held on with duct tape. This helps with proper drainage as well as discourages rodents from gnawing through and into your soon to be compost.


Step 4: Set up hollow bricks in a circle in order to allow for proper drainage. Regular bricks can work, but you'll want to put them on their sides so that there is still space for water to seep back down to the ground. Place your new compost bin over the bricks. You may need more bricks to keep the composter level if the ground is at all bumpy. You will want to set this up somewhere that animals are less likely to bother the bin, but that it will get at least partial sunlight. One of the reasons small bins work is that the self-contain natural heat from the sunlight, as well as from the natural gases.


Step 5: Start layering your compost. Keep this ratio in mind: 1-1-2. That's one part brown waste, or dried materials. One part is green or vegetable waste materials. The last 2 parts should be dirt. Dirt, leaves, paper, green food waste, more leaves. Add about a gallon of water over the mix and let set. Make sure to keep layering as you go. Avoid putting plastics, ink dense advertisement paper, animal waste/byproducts, and daily garbage in your compost. Yard waste, fruit and veggie trimmings, coffee grounds and paper are good starts. Try to keep the balance of the compost too by using different layers of wet and dry materials. Keep adding water each time you add layers. Now you are ready to cap your new compost bin. Make sure to check back in a couple days and use your shovel to mix up the compost.


Making your own compost containers for outside is a simple process that every gardener should at least try once. Humans can harness this natural process of returning nutrients into soil by composting outdoors and indoors.
ReplyDeleteBy the way, you did a great job. Thanks for sharing.